Thank you so much. And thank you to your son for picking my number.
Monday, November 7, 2011
I'M a Winner!!!!!!!!!
Wow, wonders never cease. I was catching up on my reading, of blogs, and low and behold, I see I actually won a give away on a blog, The Middle Sister. She has lots of stuff on her blog I'm into: rug hooking, applique, hexagons (wonder if I'll ever get my hexagon quilt done?). And following her blog, get's me traipsing off into the never never land of internet blogs from her list of blogs that inspire her. So you just go to her blog and check her stuff out and then you go visiting to the list of people that inspire her and there's just a wealth of creativity connected with that blog.
Sunday, November 6, 2011
Four Patch Pincushion
 What does one do when they have lots they should do? Make a pincushion. It's not like I started another huge project that ate up the entire day and it really came under the heading of cleaning up because I used some left over pieces, that were already pieced, that I came across while looking through scraps while contemplating yet another scrap quilt. This while listening to some news show on TV where they were discussing how some municipalities are banning leaf blowers. I sure wish my town would jump on that. Of course I was listening to leaf blowers while the program was on. I don't get it, winds predicted to be 30 mph today and people are out there blowing their leafs. I'm just watching mine blow away.
 So I took the four patch, lined it with some sheet sewing around the edge 1/8", found some more of the yellow fabric and cut it out the same size as the 4 patch, lined it, sewed em together leaving a small opening, turned it inside out, filled it with ground walnut shells, and then blind stitched the opening and sewed two buttons on in the center. Use a long sturdy needle for the buttons. Sewing the sheet to the pieces first and then sewing them faces together makes it so you are only dealing with the face fabrics when you slip stitch and my guess is walnut shell dust won't be coming through the fabric because it's lined and has to work through two layers.
And as for walnut shells, the prices some people charge is ridiculous. You can get walnut shells, in bags at your local pet store. They sell it for birds and lizard cages. You can get enough to do a gazillion pincushions for about $7.00. Or you can but it on Ebay or Etsy, or your local quilt shop for around $3.00 a cup. My bag had 5 quarts = 20 cups.
Thursday, November 3, 2011
IT'S NOT A QUILT TIL IT'S QUILTED

 I should probably practice on pot holders first. Will that happen? It's doubtful. If I can get these sandwiched this weekend, I'll be quilting em next week/weekend.
 And I have another all cut up ready to sew. Except I have to check all my pieces before I sew because I was on heavy duty prescription pain killers when I cut it up. I did have the good sense to leave myself a note that says: "double check everything, you were on pain pills and muscle relaxers when cut out." I had forgotten about the muscle relaxers.
Wednesday, November 2, 2011
New Boots

I'm finding I just can't stand to wear pantyhose any longer so I'm changing my wardrobe. This is the latest addition to my wardrobe. I love em. They look great with a lot of my skirts. Ariat Boots! And I see they are on sale this week, slightly $10.00 off.
Monday, October 17, 2011
Scraps, Scraps, and More Scraps
 I found a maple leaf pattern that I liked the finished size so I'll be using up more of my scraps to make maple leaves. It makes a 9 1/2 or 9 inch finished block so how many will I need to make a decent sized quilt?
Meanwhile, I've been using up the scraps from the wedding quilt making this block

There are a multitude of ways to lay them out but I'm kinda leaning towards this layout.

I put the borders on the last quilt I made, but have yet to take a picture of it. Thursday or Friday I'll get an opportunity to take a picture of it.
Friday, September 23, 2011
Riley Blake Designs, never again.


I have one quilt almost finished, three in progress, another in the back of my mind stage.
I'm almost done with this quilt.
I'm just about finished despite the "designer's" (term used facetiously) lack of instructions. First the instructions list all this fabric. Okay, do you really think the lady at the fabric store gave me yards and yards of extra fabric. I have one piece I have a yard left over, another piece a half a yard left over, and I basically have a bag of fabric that weighs more than the damn quilt top so I can certainly make another quilt out of the leftovers.
The instructions were free so I guess I shouldn't complain. Note to self, you get what you pay for. So the instructions. My first clue something was wrong was after I cut up the fabric. I should have totaled up what they tell you you need--almost 7 yards of fabric plus 5/8 more for your binding before I purchased the fabric. Then I would have had to sit there and do math to figure out which one was wrong. At least 2 are wrong as I have a yard left over of something and 1/2 a yard of something else and I've cut all the fabric for borders. They tell you to purchase almost 7 yards of fabric. Why would you need almost 7 yards of fabric to make a quilt top that only requires 5 yards of fabric for the backing--or is the math wrong on the backing, that's easily checked against the dimensions: 64 x 80--5 yards will back that for sure. It might get that big with three more borders. And that folks explains why I have over a yard and a half of some pieces and large scraps of the others. Free patterns are designed to sell fabric. AND LOTS OF IT. Like way more than you need.
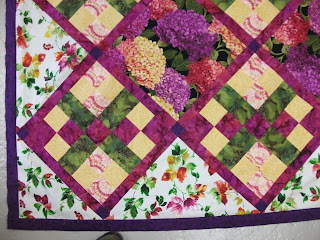
The "design", term used again in jest is one of Riley Blake Designs called Sweet Isabella.
The problem with this pattern is first you buy way too much fabric and I suppose they're hoping you buy their fabric. Then you make 2 different 4 patch blocks and join em, they don't go into detail about how: side by side, top to bottom, which way you need to press your seams. So you make these blocks. Now what, you still have all these little squares and strips. I guess that's referred to as posts and sashing? What do I know, this is my third quilt. How to I put the rest of this thing together.
Well, here's how folks: "Quilt Center Assembly: See quilt photo for sashing, post and block placement. Sew rows together on the diagonal to complete the center of the quilt. Add corner triangles. Before adding borders square up leaving 1/4 seam allowance. Okay when and where do I put the sashing and blocks/posts? I don't know how I managed to figure it out (and it was with no response to my email asking for further instruction) but I do and my quilt has a distinct difference from theirs. Look at theirs. The blocks are half cut off at the edges before the first border row, they're like only 1 1/2 inch blocks, why would you want them cut off on the edge. I don't know how I did it but I managed to have 1/4 in seam allowance after squaring off and sewing on first row of binding and have the whole square showing, with no help from them, after all I did email them for help. No response.
So in the future I will be very wary of free designs, designed to prompt you to buy extra fabric apparently, and I doubt I'll ever mess with a Riley Blake Designs pattern again because trying to figure how and when you sew the stuff together and sewing and ripping out and resewing just wasted too much of my free time. It's supposed to be fun and easy, not tear your hair out frustrating. I can follow instructions but I need instructions to follow and make it look the the picture doesn't cut it. But to instruct you as to if you should sew to the side or top and when and where to put the block might have forced em to go to a third page. Well I've done layouts and if you didn't waste a third of the first page on your logo you could have put maybe your accurate fabric requirements on the front/first page which would have given plenty of room for a sentence or two regarding the sashing/post/blocks, which was in my mind KEY INFORMATION.
Sunday, September 4, 2011
Finished


 My solution to that was to sew the binding on, thread a gazillion needles with thread poke em into my mattress and every night sew a few needles worth. It took me 4 nights of this and an hour or two before the quilt guild meeting to finish the binding. Once again, quilted by Linda atBee Quilted.


This quilt seems impossible to photograph. Not sure if it's my lack of skills or the camera. So I just made a slide show of all the photos.
Subscribe to:
Posts (Atom)