I have one quilt almost finished, three in progress, another in the back of my mind stage.
I'm almost done with this quilt.
I'm just about finished despite the "designer's" (term used facetiously) lack of instructions. First the instructions list all this fabric. Okay, do you really think the lady at the fabric store gave me yards and yards of extra fabric. I have one piece I have a yard left over, another piece a half a yard left over, and I basically have a bag of fabric that weighs more than the damn quilt top so I can certainly make another quilt out of the leftovers.
The instructions were free so I guess I shouldn't complain. Note to self, you get what you pay for. So the instructions. My first clue something was wrong was after I cut up the fabric. I should have totaled up what they tell you you need--almost 7 yards of fabric plus 5/8 more for your binding before I purchased the fabric. Then I would have had to sit there and do math to figure out which one was wrong. At least 2 are wrong as I have a yard left over of something and 1/2 a yard of something else and I've cut all the fabric for borders. They tell you to purchase almost 7 yards of fabric. Why would you need almost 7 yards of fabric to make a quilt top that only requires 5 yards of fabric for the backing--or is the math wrong on the backing, that's easily checked against the dimensions: 64 x 80--5 yards will back that for sure. It might get that big with three more borders. And that folks explains why I have over a yard and a half of some pieces and large scraps of the others. Free patterns are designed to sell fabric. AND LOTS OF IT. Like way more than you need.
The "design", term used again in jest is one of Riley Blake Designs called Sweet Isabella.
The problem with this pattern is first you buy way too much fabric and I suppose they're hoping you buy their fabric. Then you make 2 different 4 patch blocks and join em, they don't go into detail about how: side by side, top to bottom, which way you need to press your seams. So you make these blocks. Now what, you still have all these little squares and strips. I guess that's referred to as posts and sashing? What do I know, this is my third quilt. How to I put the rest of this thing together.
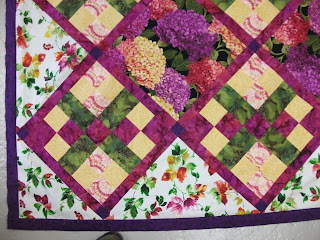
Well, here's how folks: "Quilt Center Assembly: See quilt photo for sashing, post and block placement. Sew rows together on the diagonal to complete the center of the quilt. Add corner triangles. Before adding borders square up leaving 1/4 seam allowance. Okay when and where do I put the sashing and blocks/posts? I don't know how I managed to figure it out (and it was with no response to my email asking for further instruction) but I do and my quilt has a distinct difference from theirs. Look at theirs. The blocks are half cut off at the edges before the first border row, they're like only 1 1/2 inch blocks, why would you want them cut off on the edge. I don't know how I did it but I managed to have 1/4 in seam allowance after squaring off and sewing on first row of binding and have the whole square showing, with no help from them, after all I did email them for help. No response.
So in the future I will be very wary of free designs, designed to prompt you to buy extra fabric apparently, and I doubt I'll ever mess with a Riley Blake Designs pattern again because trying to figure how and when you sew the stuff together and sewing and ripping out and resewing just wasted too much of my free time. It's supposed to be fun and easy, not tear your hair out frustrating. I can follow instructions but I need instructions to follow and make it look the the picture doesn't cut it. But to instruct you as to if you should sew to the side or top and when and where to put the block might have forced em to go to a third page. Well I've done layouts and if you didn't waste a third of the first page on your logo you could have put maybe your accurate fabric requirements on the front/first page which would have given plenty of room for a sentence or two regarding the sashing/post/blocks, which was in my mind KEY INFORMATION.