Thank you so much. And thank you to your son for picking my number.
Monday, November 7, 2011
I'M a Winner!!!!!!!!!
Wow, wonders never cease. I was catching up on my reading, of blogs, and low and behold, I see I actually won a give away on a blog, The Middle Sister. She has lots of stuff on her blog I'm into: rug hooking, applique, hexagons (wonder if I'll ever get my hexagon quilt done?). And following her blog, get's me traipsing off into the never never land of internet blogs from her list of blogs that inspire her. So you just go to her blog and check her stuff out and then you go visiting to the list of people that inspire her and there's just a wealth of creativity connected with that blog.
Sunday, November 6, 2011
Four Patch Pincushion
 What does one do when they have lots they should do? Make a pincushion. It's not like I started another huge project that ate up the entire day and it really came under the heading of cleaning up because I used some left over pieces, that were already pieced, that I came across while looking through scraps while contemplating yet another scrap quilt. This while listening to some news show on TV where they were discussing how some municipalities are banning leaf blowers. I sure wish my town would jump on that. Of course I was listening to leaf blowers while the program was on. I don't get it, winds predicted to be 30 mph today and people are out there blowing their leafs. I'm just watching mine blow away.
 So I took the four patch, lined it with some sheet sewing around the edge 1/8", found some more of the yellow fabric and cut it out the same size as the 4 patch, lined it, sewed em together leaving a small opening, turned it inside out, filled it with ground walnut shells, and then blind stitched the opening and sewed two buttons on in the center. Use a long sturdy needle for the buttons. Sewing the sheet to the pieces first and then sewing them faces together makes it so you are only dealing with the face fabrics when you slip stitch and my guess is walnut shell dust won't be coming through the fabric because it's lined and has to work through two layers.
And as for walnut shells, the prices some people charge is ridiculous. You can get walnut shells, in bags at your local pet store. They sell it for birds and lizard cages. You can get enough to do a gazillion pincushions for about $7.00. Or you can but it on Ebay or Etsy, or your local quilt shop for around $3.00 a cup. My bag had 5 quarts = 20 cups.
Thursday, November 3, 2011
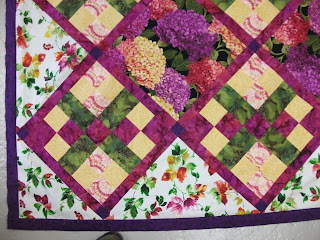
IT'S NOT A QUILT TIL IT'S QUILTED

 I should probably practice on pot holders first. Will that happen? It's doubtful. If I can get these sandwiched this weekend, I'll be quilting em next week/weekend.
 And I have another all cut up ready to sew. Except I have to check all my pieces before I sew because I was on heavy duty prescription pain killers when I cut it up. I did have the good sense to leave myself a note that says: "double check everything, you were on pain pills and muscle relaxers when cut out." I had forgotten about the muscle relaxers.
Wednesday, November 2, 2011
New Boots

I'm finding I just can't stand to wear pantyhose any longer so I'm changing my wardrobe. This is the latest addition to my wardrobe. I love em. They look great with a lot of my skirts. Ariat Boots! And I see they are on sale this week, slightly $10.00 off.
Monday, October 17, 2011
Scraps, Scraps, and More Scraps
 I found a maple leaf pattern that I liked the finished size so I'll be using up more of my scraps to make maple leaves. It makes a 9 1/2 or 9 inch finished block so how many will I need to make a decent sized quilt?
Meanwhile, I've been using up the scraps from the wedding quilt making this block

There are a multitude of ways to lay them out but I'm kinda leaning towards this layout.

I put the borders on the last quilt I made, but have yet to take a picture of it. Thursday or Friday I'll get an opportunity to take a picture of it.
Friday, September 23, 2011
Riley Blake Designs, never again.


I have one quilt almost finished, three in progress, another in the back of my mind stage.
I'm almost done with this quilt.
I'm just about finished despite the "designer's" (term used facetiously) lack of instructions. First the instructions list all this fabric. Okay, do you really think the lady at the fabric store gave me yards and yards of extra fabric. I have one piece I have a yard left over, another piece a half a yard left over, and I basically have a bag of fabric that weighs more than the damn quilt top so I can certainly make another quilt out of the leftovers.
The instructions were free so I guess I shouldn't complain. Note to self, you get what you pay for. So the instructions. My first clue something was wrong was after I cut up the fabric. I should have totaled up what they tell you you need--almost 7 yards of fabric plus 5/8 more for your binding before I purchased the fabric. Then I would have had to sit there and do math to figure out which one was wrong. At least 2 are wrong as I have a yard left over of something and 1/2 a yard of something else and I've cut all the fabric for borders. They tell you to purchase almost 7 yards of fabric. Why would you need almost 7 yards of fabric to make a quilt top that only requires 5 yards of fabric for the backing--or is the math wrong on the backing, that's easily checked against the dimensions: 64 x 80--5 yards will back that for sure. It might get that big with three more borders. And that folks explains why I have over a yard and a half of some pieces and large scraps of the others. Free patterns are designed to sell fabric. AND LOTS OF IT. Like way more than you need.
The "design", term used again in jest is one of Riley Blake Designs called Sweet Isabella.
The problem with this pattern is first you buy way too much fabric and I suppose they're hoping you buy their fabric. Then you make 2 different 4 patch blocks and join em, they don't go into detail about how: side by side, top to bottom, which way you need to press your seams. So you make these blocks. Now what, you still have all these little squares and strips. I guess that's referred to as posts and sashing? What do I know, this is my third quilt. How to I put the rest of this thing together.
Well, here's how folks: "Quilt Center Assembly: See quilt photo for sashing, post and block placement. Sew rows together on the diagonal to complete the center of the quilt. Add corner triangles. Before adding borders square up leaving 1/4 seam allowance. Okay when and where do I put the sashing and blocks/posts? I don't know how I managed to figure it out (and it was with no response to my email asking for further instruction) but I do and my quilt has a distinct difference from theirs. Look at theirs. The blocks are half cut off at the edges before the first border row, they're like only 1 1/2 inch blocks, why would you want them cut off on the edge. I don't know how I did it but I managed to have 1/4 in seam allowance after squaring off and sewing on first row of binding and have the whole square showing, with no help from them, after all I did email them for help. No response.
So in the future I will be very wary of free designs, designed to prompt you to buy extra fabric apparently, and I doubt I'll ever mess with a Riley Blake Designs pattern again because trying to figure how and when you sew the stuff together and sewing and ripping out and resewing just wasted too much of my free time. It's supposed to be fun and easy, not tear your hair out frustrating. I can follow instructions but I need instructions to follow and make it look the the picture doesn't cut it. But to instruct you as to if you should sew to the side or top and when and where to put the block might have forced em to go to a third page. Well I've done layouts and if you didn't waste a third of the first page on your logo you could have put maybe your accurate fabric requirements on the front/first page which would have given plenty of room for a sentence or two regarding the sashing/post/blocks, which was in my mind KEY INFORMATION.
Sunday, September 4, 2011
Finished


 My solution to that was to sew the binding on, thread a gazillion needles with thread poke em into my mattress and every night sew a few needles worth. It took me 4 nights of this and an hour or two before the quilt guild meeting to finish the binding. Once again, quilted by Linda atBee Quilted.


This quilt seems impossible to photograph. Not sure if it's my lack of skills or the camera. So I just made a slide show of all the photos.
Monday, July 25, 2011
Easter Lily Quilt
I've been working on a quilt since July 4th weekend. I sewed 24 blocks that weekend, then spent the following week deciding if I should go the full 36 blocks for a queen size and thought, may as well. So a Friday evening of cutting 12 more blocks. A sit and sew at the library with the local guild and over 10 hours of machine quilting and it's almost done. Linda at BEE QUILTED did the quilting, I had input on the design and she even let me run the machine a little. And it's still work, a lot of work. Now I just need miles of binding, sew it on and slip stitch the other side.


This is my second quilt, the first one hasn't been quilted yet, so now I need to read up on just exactly how you do this binding stuff, especially at the corners, though I imagine it's similar to finishing my rugs.
so now I need to read up on just exactly how you do this binding stuff, especially at the corners, though I imagine it's similar to finishing my rugs.So whoala, my masterpiece, I'm considering stitching on seed pearls for either the eyes on the humming bird, stamens on the petals, or both.
Saturday, June 4, 2011
This just isn't natural


Saturday, May 7, 2011


Wednesday, May 4, 2011
How To Save Money On Your Annual Lawnmower Tune Up

It finally quit snowing, and then rained and rained and rained. Usually I can get away with not mowing the lawn until Memorial Day Weekend, but not this year. Between the "organic fertilizer" and the rain, it needs mowed now.
So I go to start it up, and of course no. It starts but won't stay running. I entertained the idea of searching on the internet but opted for my usual method, which seems to work on anything. You just start taking it apart and find either parts that are broken or don't seem right and put em in a bag and go to the store and get the same parts and then put it back together. If it doesn't work oh, well, it didn't work before and at least I tried. But I've been real sucessful with this method. The dryer once, washer 2 or 3 times, refrigerator once and that one was major--a $45, non-returnable part. That's as close as I've ever come to gambling with my money.
So off to Meijer's I go. All they have is spark plugs, not this other thing I need, a filter of some sort. Well why stand in line for 1.97 spark plug when you have to go to another store, Walmart, to hopefully get the filter. A spark plug is a spark plug; how much can the price vary? Apparently 50% or so.
So off to Walmart. Filter, yep, Spark Plug 2.97. WT....hm, do I go back to Meijer to save a dollar? Not just yet...off to the automotive section I go. In with the spark plugs for cars is spark plugs for small engines, with the same number on the side as the the one for 2.97 in the garden section. So I leave the 2.97 one there and take the 1.78 with me to the register. Now how weird is that 2.97 in the gardent section, 1.78 in the automotive section.

Oh, I'm done with the quilt, pictures some other day, have started another, and work continues on the purple rug. The red and white will be the traditional Irish Chain pattern.
Tuesday, April 12, 2011
I Thought I Was Done Cutting
 I thought after spending close to 4 hours cutting up approximately 10 yards of various fabrics into strips of various widths and squares of various sizes I was done cutting. Nope. I spent approximately two more hours cutting those squares into triangles. I now have to connect this mess of triangles together in a specific order, 4 times, one for each side of the quilt. I finally got the last giagantic triangle thing for the top done and gave up and hand stitched it. Wanting to feel like I actually made some progress I spent the rest of the evening joining merely one quarter of the triangles. There must be a trick to it that I've yet to figure out. Three more borders to go, there's hope I'll stumble upon it.
 While I was working on this quilt I got to thinking about a quilt I got at GoodWill for $10. How can anyone value a handmade quilt so little that they would give it to GoodWill. It was signed no less. Someone cut and pieced and put a backing and batting together and quilted this quilt for someone that just gave it away to GoodWill. I suppose once you give something to someone it's there's to do with as they wish. On the other hand, maybe the maker decided the intended recipient was not worthy of the heart and sole they'd put into the quilt and gave it to GoodWill. I'd rather believe that. Interesting thing was, GoodWill placed very little value on it. It wasn't priced. When I asked for a price, I was expecting it would be higher than the commercial made quilt it was hanging next to. So when the person said $10, I said okay. And so much for quilting tonight.
Meanwhile this is where I'm at on the rug I started last year at some point. It's getting closer to done, but I really only hook on it one evening a week. I think when I pick it up next I'll work on some of the outer border since I have quite a bit I could be working on and I hate doing outer border all at once, especially on a decent sized rug.

Monday, April 4, 2011
Progress is Progress

I got the top and bottom black strips on today and the weird giagantic triangle that resembles a flying geese.
I've never made a quilt. I started a quilt you do in long thin sections, quilting each section and attaching it to the next. That's all neatly toted up and the instructions are actually with it. That's a miracle in my world.
Then there's my gazillion 3/4 inch hexagons I'm piecing my hand. Might be ready in time for my funeral blanket perhaps.
And then there's this, that up until tonight, the cutting out part seemed the hardest until I came to this:
Trim the four 6 1/4 x 44 black flor and four 6 1/4 paisley strips to the same length as the four sides of the quilt center border. About 38.5. Well I'm trimming side by side on the off chance I'm a hair off soemwhere.
The next part is lay a trimmed paisley strip right sides up on each of the four trimmed black floral strips also right sides up.
Fold two opposite corners of the paisely strip down between the two strips forming the long border triangle. This actually looks like a giant flying geese.
The center point shoudl be 1/4 from the edge of the floral (bottom) strip so it isn't sewn into the seam. SO THE POINT SHOWS. The ends of the paisley strip should cross where the 1/4 seams will intersect. Press fold and then trim excess to 1/4 seam allowance. HAND or mAchine stitch paisley triangles to the black floral. Serioulsy, like this is going to be the only thing with top stitching. I don't think so.
So I measure, fold, press, etc and BASTE the stitching line and somehow manage to stich this one long side at a time. What I don't understand, since there's plenty of extra on the black floral is why it's not done like a flying geese. I need to check my extra pile and see if I have enough to experiment with. This is going to be one side pernight, which means I won't finish by Friday. Unless perhaps I spend the rest of the evening drawing my lines on the back of the fabrics, basting (machine) the fold lines, pressing and then pinning in preparation for sewing maybe two tomorrow.
Sunday, April 3, 2011
 I spent Friday evening cutting instead of hooking. It seems I have almost as much left over, on the left, as I cut. Other than that it seems I've been busy accomplishing nothing while waiting for Spring. It's still Winter here in Michigan. I've cut out a skirt that probably won't fit, so it's all in a plastic bag where it will stay until the scale shows less than it currently does. There's hope it may fit by Summer. Heck, there's even hope we'll have Summer this year. Who knows, maybe I can make a small throw out of the remains.
This is the center portion of the quilt, hanging from the drapes. Who knew a window could double as a design wall. There's also a rug hooking pattern behind the quilt center, and pattern directions from projects I've been working on, as well as the quilt, are also pinned to the drapes. And the whole purpose of locating the sewing machine in front of the window was to enjoy the view. That's not happening so far. Everything has to do double or triple duty in a miniature house.
I also dyed some wool last week. I started with a dark oatmeal, a yellow and white check, and a pale beige with pale green stripes running through it. 

Monday, February 28, 2011
DO I DARE
aka sewing a vintage pattern that is two sizes too small.
Okay, I must have weighed 25-30 lbs less when I acquired this pattern, or I was delusional, or I thought maybe some day it would fit. Who knows. I've had it for a long time. The envelope cover is literally disintegrating. I keep it in a plastic sleeve and every time I look at it more of the envelope falls apart. The measurements are barely there, the only reason I know the pattern number is because it's on the instructions.
This is the pattern, obviously not my picture, because on this one you can actually read the size.

But, and it's a big but, it is two sizes too small. But I want it. And I really don't want to learn what I'd need to learn about grading patterns to grade this up two sizes to make it out of a woven. So my solution was to spend an entire evening measuring all the pattern pieces, figuring out based on measurements what the ease was, doing the math on if "I add 1/4 inch to every seam" it will still not fit, thinking about 1/2 and deciding I'm not up for any more math or disappointment and then arriving at the brilliant idea to lay it out against a dress I have that fits, that I destroyed by spilling nail polish remover on, but saved because it fits. It is made out of knit. The fabric I want to make it out of is knit. So okay, it appears it will work.
So, I've ironed all the pieces, which amazingly enough are not fragile like the envelope, and tomorrow I will lay it out and cut. Plan b is well if it doesn't fit, I'll still be able to make a skirt out of the bottom half pieces and hey, I'll be on my way to a many pieced ensemble but I'm really hoping the dress works out.
Wednesday, February 23, 2011
My Wool Has Been Shipped and Pants Update
I'm so excited. The wool I ordered on Presidents Day is on it's way.
Is it suitable for a coat. Nope, still haven't found the perfect wool for any of my vintage coat patterns. But while looking I came across this great wool, that yes, it will work for a retro suit jacket and, bonus, I can dye the excess for rug hooking. How much excess will there be, oh about 7 yards or so.
Meanwhile, the pants. Well I pretty much went as far as I'm going on the pants. The good news is, hey they fit. And the bad news. My fabric selection sucked--but remember, I have no fabric for pants because I generally don't sew pants and this fabric was free. I burn tested it and hey, it's not synthetic, so I think I will sew up the side seam, attach the facing, baste the hem edge so it doesn't ravel and wash these every time I do a dark load and see how much this fabric will soften up. I don't want to waste my time on a zipper unless these soften up. So it's cotton, it's a medium weight twill, there is some hope these could end up very soft and hanging very nicely by summer. Currently they are too stiff. It's like trying to make something out of cardboard. So now that I know they'll fit, I just need to make them out of something decent fabric wise.
And now for he darts. Check out the angle of the darts. Different eh, but they work. Anyway, having difficulty the first time out with trying to pin and sew I gave that method up and basted just inside the line I should be stitching on. I wised up after the first one and used a contrasting thread.
 Then I finger pressed along those lines to form a ditch to stitch in, then I matched up the stitch lines to find the fold line for the dart and finger pressed that. Then I sewed just outside the basting. The threads on the outside are the bobbin from the basting using contrasting color. You just pull those threads and your basting goes away. More on these after a few months of washing.
Is it suitable for a coat. Nope, still haven't found the perfect wool for any of my vintage coat patterns. But while looking I came across this great wool,
 that yes, it will work for a retro suit jacket and, bonus, I can dye the excess for rug hooking. How much excess will there be, oh about 7 yards or so.
Meanwhile, the pants. Well I pretty much went as far as I'm going on the pants. The good news is, hey they fit. And the bad news. My fabric selection sucked--but remember, I have no fabric for pants because I generally don't sew pants and this fabric was free. I burn tested it and hey, it's not synthetic, so I think I will sew up the side seam, attach the facing, baste the hem edge so it doesn't ravel and wash these every time I do a dark load and see how much this fabric will soften up. I don't want to waste my time on a zipper unless these soften up. So it's cotton, it's a medium weight twill, there is some hope these could end up very soft and hanging very nicely by summer. Currently they are too stiff. It's like trying to make something out of cardboard. So now that I know they'll fit, I just need to make them out of something decent fabric wise.
And now for he darts. Check out the angle of the darts. Different eh, but they work.
 Anyway, having difficulty the first time out with trying to pin and sew I gave that method up and basted just inside the line I should be stitching on. I wised up after the first one and used a contrasting thread.
 Then I finger pressed along those lines to form a ditch to stitch in, then I matched up the stitch lines to find the fold line for the dart and finger pressed that. Then I sewed just outside the basting. The threads on the outside are the bobbin from the basting using contrasting color. You just pull those threads and your basting goes away. More on these after a few months of washing.
Tuesday, February 22, 2011
Vintage ? Vogue 7648
 I had planned on cutting out a coat, but no I didn't have enough fabric for any of the vintage coat patterns I have especially when I know I'm going to need to lengthen the sleeves and probably the bodice too by at least 3 inches. I couldn't just take off and go to the fabric store, not that there would be a whole lot of selection had I managed to get there, because we got dumped on with a blizzard.
Given that I have 5 comic book boxes of patterns, a baby bed full of fabric, yes that's where I store my fabric, in a baby bed with a folding door on top that acts as my cutting table, chances were good I had a pattern and fabric I could amuse myself with. So I went through my patterns and pulled a pattern and fabric I thought my work and cut it out.

I'm not exactly sure what the content of the fabric is. It's blue twill weave that was given to me. I got as far as sewing the darts tonight. Which is not accomplishing a whole heck of a lot. The darts have slightly different angle than your usual dart, so this should be interesting. I was able to mark the darts rather nicely with some weird tool I picked up somewhere. Check out these
 markings.
So while I had no problem seeing where I was supposed to be pinning and sewing it didn't seem to go so swell on the first dart.
My solution: I basted along those lines and pressed, then sewed the darts.
So what will these mystery pants look like when done. Hopefully nice, hopefully they'll fit and I can make em again with different fabric. Yes, I would have to go to the store for that because fabric for pants is not something I stock up in the baby bed.
Having seldom been able to find pants that fit I pretty much don't wear pants. Levi's is the extent of my pants wardrobe. And when you check out this pattern, they're not really pants either. They look like pants from the back but have a panel across the front so it looks like a skirt. And the legs are rather wide. So all this pattern really needs to do is pretty much fit like a skirt and life will be good.
And while the envelope lists lightweight fabric such as Gabardine, Wool, Crepe, Denim, (DENIM is LIGHTWEIGHT), synthetic suede and Woolens, I think they will look good with a fabric with some weight to it but drape too. Wool Gabardine would be nice, but then I'd have to line them. Who knows. We'll see if they actually fit before I get to involved in what to use next. And no, they're not vintage. The copyright is 2002.
Monday, February 21, 2011
How Many Hours
Need inspiration, think your colors don't go together?
You can kill hours at this site:
http://labs.ideeinc.com/multicolr/#
enjoy, that's where I'll be for a while.
You can kill hours at this site:
http://labs.ideeinc.com/multicolr/#
enjoy, that's where I'll be for a while.
Monday, February 14, 2011
A better Townsend Cutter carrying case
 I've defeated the dogs once again--doesn't happen often.
When I got my Townsend Cutter, which I love, it came with a carry case with a webbed handle. On of the dogs promptly chewed the handle. I like this a whole lot better. You can find these all over in various conditions. This one was pristine and even had the keys that had never even been removed from the plastic.
All you need to do is make a few drawstring bags, perhaps out of quilted fabric or wool, to protect your cutters, lay em in the bottom and put your cutter on top.
I'm pretty sure the handle on this is dog proof. The case is for sure.
And there's plenty of room left over for your other bag or whatever that holds your hooks, scissors, magnets, and whatever else you drag along for hooking. PLUS, you don't have to take those black plates off to store though mine are off in this picture.
I highly recommend an old train case as a case for your cutter. I paid $10.00 plus postage for this one off Craigslist. Granted who knew if once I paypalled the guy the money if the case would ever arrive, that's the chance you take but I figured postage was cheaper than driving half way across the state to pick it up and I was in as gambling of a mood as I ever get.
Subscribe to:
Posts (Atom)